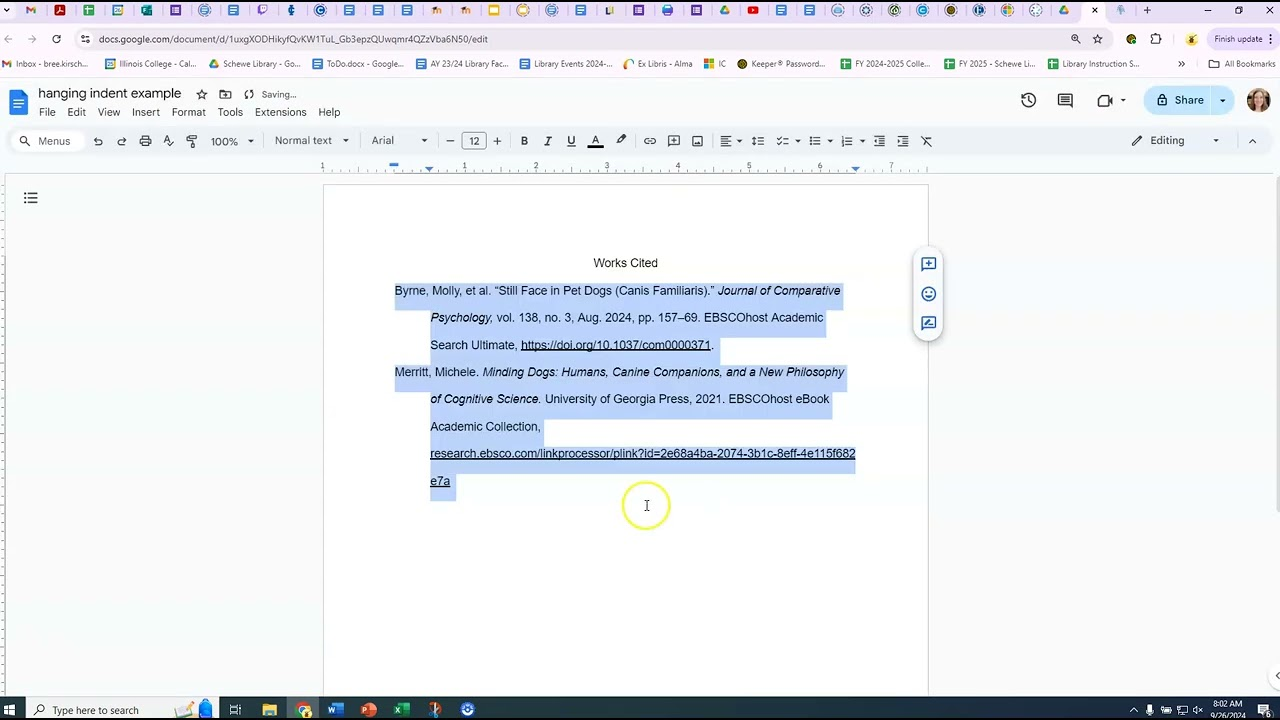
Creating a hanging indent in Google Docs is an essential skill for students, writers, and professionals. A hanging indent allows the first line of your paragraph to start at the margin while the rest of the lines are indented. This format is often used in citations and bibliographies. In this article, we will guide you on how to achieve a hanging indent in Google Docs effortlessly. Let’s get started!
WHAT IS A HANGING INDENT?
A hanging indent is a formatting style where the first line of a paragraph is flush left, and all subsequent lines are indented. This style helps set off citations and lists clearly, making them easier to read.
Benefits of Using Hanging Indents:
- Improves Readability: Hanging indents make text easier to follow.
- Organizes Information: They help visually separate titles or references from regular text.
- Professional Appearance: Creates a polished look for documents.
HOW TO CREATE A HANGING INDENT IN GOOGLE DOCS
Creating a hanging indent in Google Docs involves a few simple steps. Follow these methods to format your document correctly.
Method 1: Using the Ruler
- Open Your Document: Launch Google Docs and open your document.
- Enable the Ruler: Go to the “View” menu and click on “Show ruler” if it’s not already visible.
- Select Your Text: Highlight the text you want to format.
- Adjust the Ruler:
- Locate the small blue triangle (the First Line Indent marker).
- Drag it to the right to the desired indentation (usually 0.5 inches).
- Drag the rectangle below it (the Left Indent marker) back to the left to align with the margin.
- Done: Your text now has a hanging indent!
Method 2: Using the Format Menu
- Select Your Text: Highlight the text for the hanging indent.
- Access Format Options: Click on “Format” in the top menu.
- Paragraph Styles: Choose “Align & indent” > “Indentation options.”
- Set the Hanging Indent:
- In the dialog box, find “Special indent.”
- Select “Hanging” from the dropdown menu.
- Set the indentation distance (commonly 0.5 inches).
- Apply: Click “Apply” to see the changes.
EXAMPLES OF HANGING INDENTS
To better understand how hanging indents look, here are a few examples of how citations and references would appear:
Example 1: APA Citation
Smith, J. (2020). Understanding Measurements in Science. Science Journal, 25(3), 45-60.
Example 2: MLA Citation
Doe, Jane. “The Impact of Climate Change.” Environmental Studies, vol. 12, no. 2, 2019, pp. 34-50.
TIPS FOR USING HANGING INDENTS EFFECTIVELY
Here are a few tips to ensure you use hanging indents correctly:
- Use for Citations: Always apply hanging indents for bibliographies and works cited pages.
- Consistency is Key: Ensure you use the same indent size throughout your document.
- Preview Your Document: Always check the final look to ensure readability.
TROUBLESHOOTING COMMON ISSUES
If you encounter difficulties while formatting, here are some common problems and solutions:
Issue 1: Ruler Not Visible
- Solution: Activate the ruler from the “View” menu.
Issue 2: Indent Not Working
- Solution: Ensure the text is highlighted correctly before applying the indent.
Issue 3: Incorrect Indent Size
- Solution: Return to the “Indentation options” and adjust as needed.
CONCLUSION
Creating a hanging indent in Google Docs is straightforward and essential for clear document presentations. Whether you’re writing a research paper, essay, or article, correctly formatting your references enhances your document’s professionalism. Remember to practice consistently, and soon, using hanging indents will become second nature.